OCT: Difference between revisions
From Bay Area Structural Heart Wiki
No edit summary |
No edit summary |
||
| (5 intermediate revisions by the same user not shown) | |||
| Line 1: | Line 1: | ||
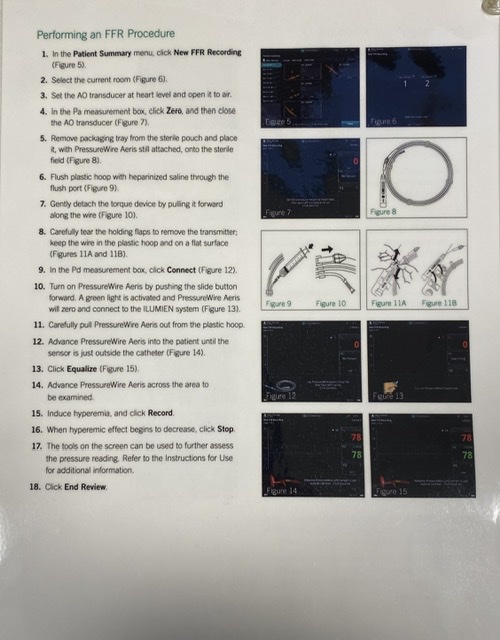
[[File:OCTInstructionsPage1.jpg|thumb|150px|right|OCT instructions Page 1|link={{filepath:OCTInstructionsPage1.jpg}}]] | |||
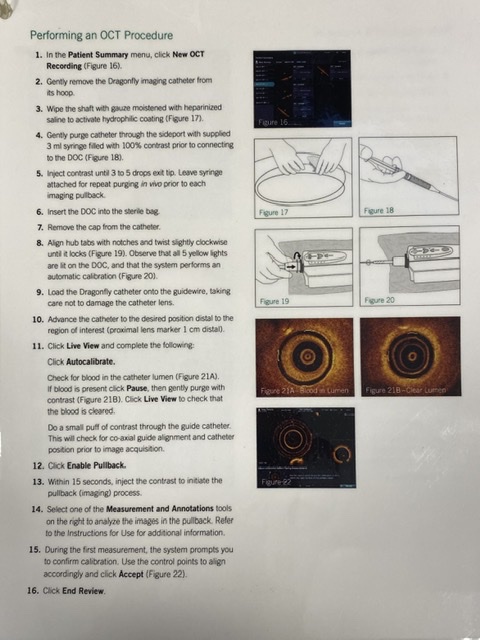
[[File:OctIFUpg2.jpg|thumb|150px|right|OCT instructions Page 2|link={{filepath:OctIFUpg2.jpg}}]] | |||
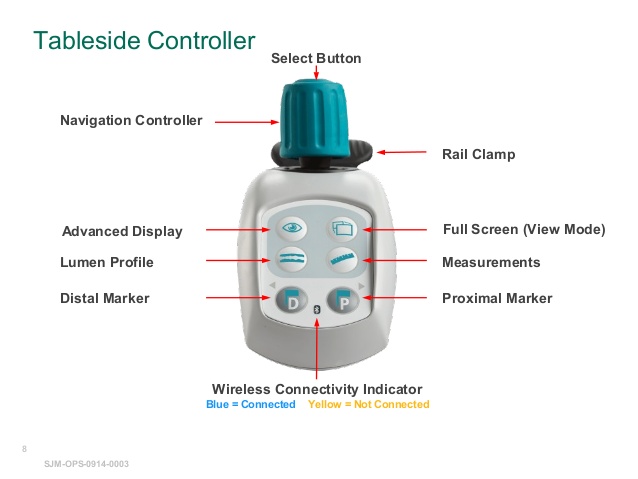
[[File:OCT-Controller.jpg|thumb|150px|right|OCT Controller for sterile table|link={{filepath:OCT-Controller.jpg}}]] | |||
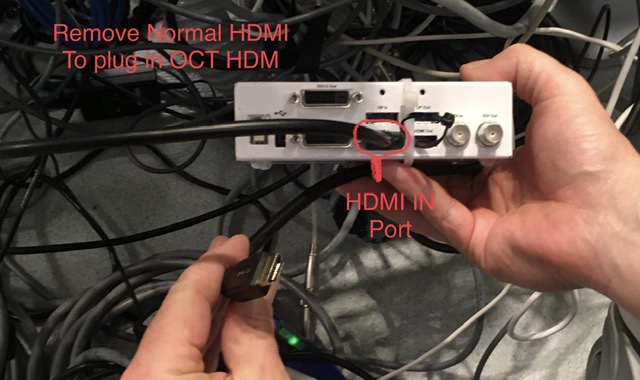
[[File:OCT-to-UniBox.jpg|thumb|150px|right|OCT connection to UniBoxlink={{filepath:OCT-to-UniBox.jpg}}]] | |||
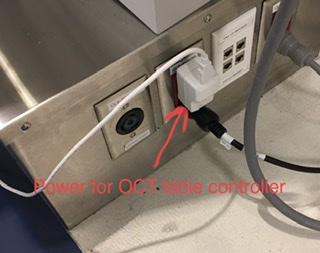
[[File:OCT-plugin.jpg|thumb|150px|right|OCT controller power plug|link={{filepath:OCT-plugin.jpg}}]] | |||
Manufacturer: [[Has Manufacturer::Abbott]] | Manufacturer: [[Has Manufacturer::Abbott]] | ||
| Line 6: | Line 11: | ||
IFU: [[Has IFU::https://www.cardiovascular.abbott/int/en/hcp/products/percutaneous-coronary-intervention/dragonfly-intravascular-imaging.html|OCT IFU page]] | IFU: [[Has IFU::https://www.cardiovascular.abbott/int/en/hcp/products/percutaneous-coronary-intervention/dragonfly-intravascular-imaging.html|OCT IFU page]] | ||
{{Note|Go to the menu -> Change Room to select the controller or room for ffr<BR>(Must be on main screen, not review!!!}} | |||
==Setup== | ==Setup== | ||
The OCT Machine is kept behind Room 6. The Catheters for the device are kept in Room 1 - Cart #6, and Room 6, Cart # 17. | The OCT Machine is kept behind Room 6. The Catheters for the device are kept in Room 1 - Cart #6, and Room 6, Cart # 17. | ||
The table controller is now labeled as “Table Controller” in the unit for the purposes of connecting the Bluetooth. | |||
===Supplies=== | ===Supplies=== | ||
| Line 15: | Line 23: | ||
*Dragonfly Catheter Kit | *Dragonfly Catheter Kit | ||
===Circulator=== | ===Circulator=== | ||
| Line 24: | Line 31: | ||
#Attach video cable. | #Attach video cable. | ||
#Turn device on. (black buttom - Right side of keyboard) | #Turn device on. (black buttom - Right side of keyboard) | ||
#Select Cath Lab 1 regardless of actual room. (Or click skip) | |||
#Select add patient. | |||
#Select manually add patient information. | |||
#Enter patient information. | #Enter patient information. | ||
#Follow prompts for setup and connection | #Select new OCT recording. | ||
#Follow prompts for setup and connection. | |||
===Scrub=== | ===Scrub=== | ||
#Take | #Take Dragonfly from Circulator. | ||
#Fill supplied syringe with straight contrast. | #Fill supplied syringe with straight contrast. | ||
#Follow prompts on screen for setup | #Follow prompts on screen for setup. | ||
==Breakdown== | ==Breakdown== | ||
| Line 41: | Line 52: | ||
==General Notes== | ==General Notes== | ||
<br /> | |||
Approved: MD Name MM/YY | |||
<hr /> | |||
[[Category:Products]] | |||
Revision as of 21:21, 25 October 2021
Manufacturer: Abbott
Product website: OCT Overview
IFU: OCT IFU page
![]() Note: Go to the menu -> Change Room to select the controller or room for ffr
Note: Go to the menu -> Change Room to select the controller or room for ffr
(Must be on main screen, not review!!!
Setup
The OCT Machine is kept behind Room 6. The Catheters for the device are kept in Room 1 - Cart #6, and Room 6, Cart # 17.
The table controller is now labeled as “Table Controller” in the unit for the purposes of connecting the Bluetooth.
Supplies
- OCT Machine
- Dragonfly Catheter Kit
Circulator
- Open Dragonfly to scrub.
- Attach white hand controller to table for MD and scrub.
- Plug controller in.
- Attach video cable.
- Turn device on. (black buttom - Right side of keyboard)
- Select Cath Lab 1 regardless of actual room. (Or click skip)
- Select add patient.
- Select manually add patient information.
- Enter patient information.
- Select new OCT recording.
- Follow prompts for setup and connection.
Scrub
- Take Dragonfly from Circulator.
- Fill supplied syringe with straight contrast.
- Follow prompts on screen for setup.
Breakdown
- Save patient information.
- Data only saved to device. Will eventually save to network.
- Shutdown device.
- Unplug and clean.
General Notes
Approved: MD Name MM/YY
